26 October, 2005

{White Mage} {I'm back!}

It's sure been a while, but I actually busted out the WHM AF today and xp'ed that again! ^^

Actually, I'm not quite sure just why I ended up leveling my White Mage again. For the longest time, I've been pondering over what job to level, and to be honest, I still don't know. Strawberrie invited me over to xp with Vagus and herself on their Ninjas, and since my White Mage was the job "within range", I went along with that. It's nice to go back to White Mage after such a long break, although I have to admit.

According to Berrie, Vagus had been raving over xp'ing down by the Cloister of Tides, deep within the Den of Rancor. I personally concurred with Vagus's choice, since I myself had xp'ed down there a long time ago, and had good memories of the place.

Even more fun, since you can xp off the Doom Toads (Undead Fallen mobs) there, I had a blast Cure-nuking to skillup my Healing Magic. Unfortunately, I think I hit the Doom Toad cap, and my Healing Magic still isn't capped. -_-

But the best thing about the Doom Toads is the sweet, sweet xp they give you, especially with an Empress Band's Dedication in effect,


/drool.

To be honest, it was a little boring playing as WHM this time around, especially with two Ninjas and a Thief. I don't think I Cured very much at all, and all I was doing was keeping a Haste cycle and throwing in the occasional Flash and Regen II. That's about it. Either way though, I enjoyed myself (and the xp!), but time will tell if I stick to leveling my WHM in the future, I guess.

In the meantime, I have Sakurato bugging me to start up BRD, which would admittedly be very useful for this little project I have in mind...^^

25 October, 2005

Reaching the cap...

I'm not exactly sure what possessed me to do so, but I've been trying to cap out my xp over the last few days. While most people leave just a small xp buffer when they hit 75, I wanted to actually hit the real xp cap and fill out the bar. Part of this is because I don't really want to have to deal with leveling down again, but I also find it rather convenient to automatically gain points in whichever area I need most.

Let me elaborate on that.

Normally, once one hits 75 and talks to the Moogle next to Maat, he or she can now xp for "limit points" by switching over to "Limit Mode" over at the Mog House. Limit points and experience points are independent of one another, so when you xp, you get either experience points or limit points, depending on which mode you're on, but not both.

Consequently, when you die, you lose experience points, but not limit points. Thus, when you die because of say, an accident or something, if you are on limit mode, you will have to wait until you are done with whatever you are doing, go back to your Mog House, switch back to XP mode, and then go do something else just so you can get your buffer back.

However, if you have capped your experience points (as in, 43,999/44,000 xp) and leave yourself on "XP mode", the game will automatically switch you over to limit mode. In addition to that, should you die and lose xp, the game automatically switches you back to xp mode. Either way, I find the idea rather appealing.

Of course, the problem is actually having to xp all the way to 43,999 xp, but since I wasn't in any real rush to go get merit points, that didn't matter to me. ^^

To make things easier, there are these new xp rings that have just been released in the last patch.


In short, the Chariot Band gives you a greater experience bonus, but less total xp while the Empress Band gives you a smaller (but still very significant bonus), but more total xp. Because of the lenghty cooldown (16 hours), this is really nice for players who just can't devote their entire day to lfg and xp'ing, and these bands really fit a busy schedule quite nicely. Nowadays, with school and work, I only really get to play at night at which point the cooldown is over. While granted, 1k extra xp a night isn't much, it sure adds up over time. It's been almost two weeks since I got my Empress Band, which means I pretty much got a free 12k xp. Not too shabby!

The bands let you really see the insane numbers when it comes to xp'ing, especially on chains. I had a little bit of spare time earlier today, and so I went up to sky to solo off the Fire Elementals there, with an Empress Band (+50% xp). I was greeted with this:


I like. ^^

Anyway, I have also been partying with Sakurato and the insanity that is her crack-driven THF over the past few days. It sure took a while, but eventually after several parties in sky and the Uleguerand Range (we really ought to try the Lu'faise Meadows sometime), I finally capped my xp tonight in a party up in sky:


Not only that, but Akanea also dinged DRG74, too! ^^

24 October, 2005

Vrtra! {Run away!}

After a peaceful lunch with some friends in that alternate world that we call "real life", I logged in to find a number of my friends in King Ranperre's Tomb. All of these friends also happens to be in BBQ. Put two and two together, and that equals just one thing.

BBQ was going to go after Vrtra today.

So down I went to King Ranperre's Tomb to try and help out with what is easily the hardest of the three CoP dragons.

Vrtra's "lair", or so to speak, is this big square-ish room in the depths of King Ranperre's Tomb. Our initial strategy involved kiting Vrtra around this room in one big circle. At some point in the loop, the Summoner party is waiting for Vrtra to come around, Leviathans at the ready, whereby a few BLMs Stun Vrtra, halting Vrtra for long enough so that the Summoners can get their Spinning Dives off, before kiting Vrtra around once again.

Vrtra is especially painful to deal with because unlike Tiamat who is Fire based and Jormungand who is Ice based, Vrtra is based on Darkness, which means he cannot be slept should the teams need time to stop and recover. Not only that, similar to the other two dragons, Vrtra also has a near-instant cast -ga spell, only that since Darkness doesn't have an AoE damage spell ala Firaga III, Vrtra casts Sleepga II instead. >_< He also has this Wing attack that is massive AoE damage, and Sleepga II at the same time, too. >_<

Needless to say, the ability to recover quickly with Curagas is very important.

However, that's not all. Like the other two wyrms, Vrtra is surrounded by aggro mobs, in this case, Lemures, Spartoi Sorcerers and Spartoi Warriors. Such pops can easily be handled by the adds party, we actually used a team of Monks to bash at all the bone mobs that pop, thanks to the ridicuous rate Monks punch through those things. However, as if 5-minute repops weren't enough, Vrtra also summons additional, NM Skeletons and Ghosts, namely Peys, Irucis, and Airis. Not only are these NM mobs naturally tougher than their regular counterparts (obviously), Vrtra summons one roughly every thirty seconds, and their hate is linked with Vrtra, meaning that instead of nicely co-operating and being kited to the Black Mage team, if not enough hate is established, they turn and head for the main alliance's tanks instead! >_<

Fortunately, Vrtra herself isn't all that difficult. She seems to have lower defense compared to both Tiamat and Jormungand, so theoretically, she will go down faster. The problem is whether the adds parties can keep things under control with all the additional mobs and Sleepgas running around.

Well, long story short,


Yeah...we lost on that one. >_<

To put it simply, the adds simply overwhelmed us. Because we were kiting Vrtra around the room, and because Vrtra's summons are connected with her, it was difficult to keep the add in one place long enough for the BLM team to nuke it to death with enough Thunder IVs and Fire IVs. Our original plan involved sleeping it with Lullaby, until we found that we had trouble getting Lullaby to stick, and sleeping the mob isn't very useful if, once we Call for Help on the mob, all the melee run in and engage, waking it up. -_-

All this movement made things incredibly laggy, to the point where I would target a mob and start casting, but by the time the command was sent through and my casting began, the mob was already on the other end of the room. ; ; Not only that, but as the summons built up, there were multiple mobs all in orange, and simply put, the BLMs just did not know which one to nuke. It is pointless to yell out "Nuke the Airi!" when there are three Airis, all chasing after the tank. Sure, I could tab around and find the one with the lowest HP, but that's losing precious time before the next summon pops.

By the time we lost, we had something like eight or ten summons running around the room, all in general chaos with every single one in orange (CFH), and four or so running after the tank who really couldn't handle all this added pressure to having Vrtra chase after him as well.

To be honest, unlike our first attempt at Tiamat nd Jormungand, I'm not sure how to beat Vrtra. I have this feeling that kiting might be a bad idea, since there're just too many complications that arise from kiting, and with all the summons and everything, things are complicated enough to keep everybody busy. The problem with engaging Vrtra straight up is his Wing move, the one that deals massive damage and Sleepga. His own, normal Sleepga II can (hopefully) be stunned with a BLM team, keeping things somewhat in order. The good thing about keeping him stationary though, is that his summons are now a lot easier to deal with since we know where they pop (which was another problem with kiting), and they are immediately within range of all the BLMs.

What might work is having the main alliance engage Vrtra straight up, with each component party having a White Mage (or someone who can Curaga) out of range to wake up the party in the event of Sleepga, something like:

Tank party: NIN, NIN, NIN, PLD, BRD, WHM (or replace some tanks with Trick Attackers)
Damage party: SMN, SMN, SMN, SMN, BRD, WHM
BLM party: BLM, BLM, BLM, BLM, BRD, RDM/WHM

In addition to that, you'll need multiple add parties to handle all the summons and pops. However, I think it is important that, in order to keep things simple, the add parties each act independently of one another, that is to say that they are not allianced up. That way, one add party cannot engage another add party's mob, clearing up any confusion that might arise. One or two add parties of MNKs can take out the regular Spartoi that pop, while two more BLM add parties take out the summons due to their frequency. Because of the nature of the adds they are dealing with, the MNK parties would be on the outer rim, taking the regular mobs, while the BLMs stay closer in to deal with the pops.

MNK party: MNK, MNK, MNK, MNK, WHM, BRD
BLM #1: BLM, BLM, BLM, BLM, RDM/WHM, BRD
BLM #2: BLM, BLM, BLM, BLM, RDM/WHM, BRD

I'm reluctant to have the MNK party CFH on their mobs so the other melee can help out, since you really don't want too many people around the MNK party because of Blood Saber. I guess all the remaining members can help out on mobs that the other teams aren't dealing with (say, two summons get out, and the BLM parties are occupied). Unfortunately, because they will be in another alliance, once the add is engaged, they cannot get outside help from the rest of the main teams.

The problem with this idea of a strategy is that it is quite BLM and BRD intensive. As I have it outlined, I would need twelve BLMs, four MNKs, six BRDs, 3 RDM/WHMs, 3 WHMs and four SMNs. BBQ probably has the manpower to meet those job requirements, except maybe for a lack of Bards. Poison Potions are another thing to keep in mind when fighting Vrtra as a counter to Sleepga, but just how impractical is it to bring enough Poison Potions to Vrtra to last the entire fight? One potion lasts two minutes or so. If the fight goes on for just two hours, that's already five stacks of Poison Potions down. Per person. Not good. -_-

20 October, 2005

Xolotl Xtrapolator

Today, the BLM KS99 group (with some help from some melee) was supposed to try taking on the KS99 fight, "Early Bird catches the Wyrm", which basically pits an alliance against an appropriately named "Wyrm". The Wyrm is like Fafnir/Nidhogg, and has all the relevant tricks, including an alliance-wide Draw In, Flame Breath, and the ability to fly. Attempting the KS99 fight is an effort to widen the KS99 horizons, due to concerns of overwhelming the market of the Aspi KS99 drops. Vagus was nice enough to let us try out his Themis Orb for the fight.

Unfortunately, when the time came to set off to the BC, half the BLMs were fighting Tiamat, and the other half of the BLMs were busy in Dynamis-Jeuno. I wasn't terribly happy. -_-

So there Vagus and I were, standing around the Balga's Dias Burning Circle. An hour passed before we decided it would be better to go back to Windurst and just _do_ something. Like level Cooking. >_<

I didn't particularly feel like leveling Cooking at the time, and thankfully, Redherr sent me a /tell asking for a favour. For those who remember, Redherr's one of my friends from quite a while back. With the rest of his social LS, Ghostbusters, they helped me clear the various avatar battles a few months ago. Since then, Redherr and I have more or less gone our separate ways, so it's nice to hear from him. ^^

Anyway, from the /tell, Xolotl had popped, and Redherr needed help killing him! I turned to Vagus and asked if he wanted to pop along for the ride, and five minutes later, Vagus had suited up his THF and we were off to the Attohwa Chasm to fight the HNM...it would be my first ground HNM in...a _very_ long time! >_<

On the way, we jumped into BBQ who were busy taking out Tiamat. I probably would've joined them, but I didn't know they were after her, so all I ended up doing was /cheering them on and sent a few nukes flying towards the Air Elementals that the adds party CFH'ed on. I left them shortly to get on with the Xolotl fight.

Xolotl is a Corse-type NM, undead, that only spawns at nighttime. If day comes by and he is not claimed, he will despawn to reappear the following nighttime, at around 2000 game time. We weren't sure if he was terribly magic-resistant, so we decided not to chance it and I nuked Fire-like spells only. He has a few moves people need to watch out for, including Silencega and some melee thing where he sends his staff-like thing flying around for quite a lot of damage. He also casts the various BLM spells, including Ancient Magic and -ga III spells.

When engaging Xolotl, he has a few summons for people to take care of, namely two Skeletons named Xolotl's Sacrifice, and Xolotl's Hound Warrior. I'm not sure if Xolotl will resummon them if they're killed, so we ended up kiting them instead. Since we fought Xolotl in the area leading up to Boneyard Gully, there are no aggro-mob, so kiting's quite easy. Heck, I think one of the THFs managed to kite Xolotl's Sacrifice all the way to the other end of the Attohwa Chasm!

Finally, Xolotl also has Dance Macabre, which is basically Charmga! Dance Macabre only affects those standing in front of Xolotl though, so be sure people are positioned accordingly to minimise the effect. I still get a chuckle whenever I have to Sleep II our Ninja, or White Mage though. ^^


The battle wasn't too long, and we fought him with just ten people. I was personally a little low on mana from miscellaneous nukes, Paralynas, and Silenas, but we rotated a BRD between the two parties so that relieved things a little. He was actually rather easy to beat, I feel, and also quite a fun fight. Too bad he didn't drop anything we wanted- only a Zoolander's Hat which would've been amazing for any BST, except that it's RA/EX and we didn't have a BST in our alliance. >_<

Oh, and as for the KS99? Well, soon after we beat Xolotl, I warped everyone back to Jeuno. Tiamat was eventually downed, and Dynamis finished, but by then, some of the Samurais who were part of the run were feeling sleepy, so we had to put it off to another day. >_<

16 October, 2005

The Savage

After some weeks of planning, today was the day TrueRune would attempt the next Promathia mission, CoP 4-2 "The Savage", better known as the fight against Ouryu.

After beating Diabolos and reading the various forums out there for ideas on strategies, we initially came to one conclusion: we would be very hard pressed to beat Ouryu with our typical setup of SAM PLD THF SMN mage + one other. All the strategies out there (at least the ones that make him easy) involve a manaburn strategy of some sort, usually involving a combination of up to three BLMs or SMNs. Furthermore, Ouryu is a wyrm, and as such as most of the typical Wyrm attacks, including Spike Flail, which is triggered by getting hate from behind Ouryu.

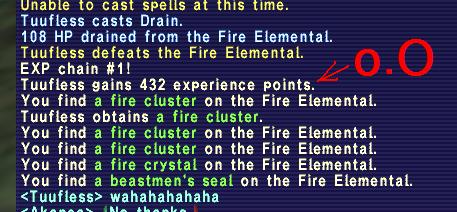
In short, {Sneak Attack}{No thanks.} ; ;

And so Saoirse undertook the long, arduous journey to level a BLM to 50 for this very battle. It took a while, but she eventually managed to get it done, and I really thank her for taking the trouble to do so, especially since she really wants to level her THF up. >_< We also managed to find a 6th member for our CoP group, a RDM by the name of Akeem, and so our Ouryu party could look like PLD SAM BLM BLM RDM SMN, which didn't look too bad.

Then one day, after talking to Onekomaru about CoP missions, we got the idea of allying with her social LS, Subligar Connection, and using all our combined BLMs, we theoretically would be able to whisk everybody through the BC without too much of a hassle. After the initial chit-chat was done, all that was left was to decide on a day to actually go try to beat Ouryu.

That day was today.

Of course, there was some preliminary work that needed to be done first in order to make the battle easier. Notably, one of the bigger problems with Ouryu is when he decides to fly. Not only does it make him immune to regular melee attacks (since the melee can't reach him), he also hits twice as hard while flying and is generally a bigger pain to deal with. However, certain EX items, called Mistmelts, can be used to force Ouryu to the ground, at least temporarily.

You get Mistmelts by farming Hippogryphs in either site in Cape Riverne, and trading two tailfeathers to Ferchinne, who can be found at (G-9) of the ground floor of the Tavnazian Safehold. Previously, TrueRune went out to Riverne Site #B01 and farmed up twenty Hippogryph Tailfeathers, or enough for ten Mistmelts. If you are going to do this BC anytime soon, Mistmelts are incredibly important, so don't skip this!

Of another note, be sure to note that while the tailfeathers can be traded between players, the Mistmelts are EX. In addition, the person who uses a Mistmelt in the battle may be stunned for a short period of time, so I prefer giving it to the melee, since they need something to do while Ouryu's in the air anyway.

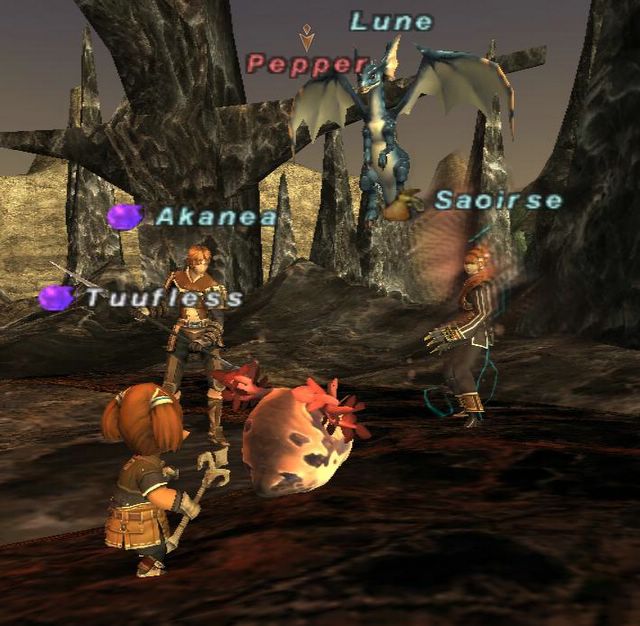
And so, when the time came, we all trooped over to Monarch Linn once again, where we discussed our battle plans. It was decided that we'd split up into three runs, and have each BLM go twice. Of course, this didn't work out in the end, but that's another story altogether.

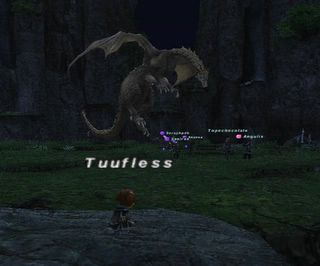
Anyway, entering the BC, who did we find, but Bahamut! Evidently, something was going terribly-werribly wrong with the world, for Bahamut had this strange notion that the return of the Keeper of the Apocalypse would spell out the doom of all the children of Altana! In short, Keeper of Apocalypse returns, and everybody dies. Yeah...

Calling out all his brothers, what resulted was an impressive display of dragon power. Just imagine all the dragons together in one place- Bahamut, Tiamat, Jormungand, Vitra, Ouryu, and a bunch of other dragons I couldn't recognise. Nidhogg, perhaps? >_<


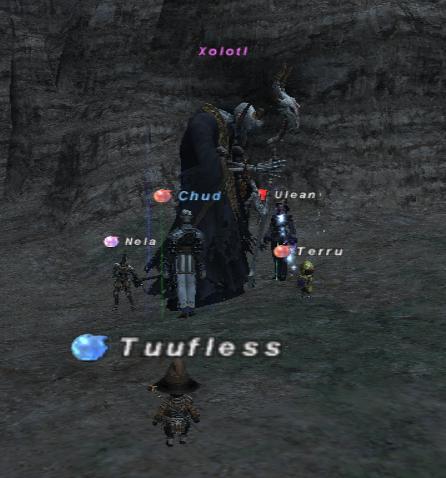
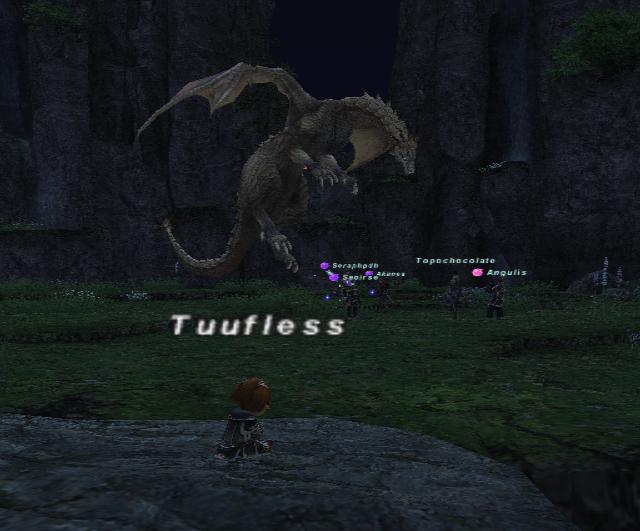
Of the wyrms, we would be fighting this one in particular:


Here are some notes about Ouryu for those who are thinking of going up against him sometime in the future:

* As I've mentioned, Mistmelts are very important. One thing that led to our (eventual) failure was that we didn't bring enough of them. I'd recommend the party bring at least six Mistmelts against Ouryu. The one time we did beat Ouryu (more on that later), we had five Mistmelts on us and we still ran out.

* Ouryu is earth-based, and so is weak to wind. That being said, do not cast Earth-based or Lightning-based spells against him.

* Keep positioning in mind. The last thing you want is a Spike Flail to wipe your entire party. On the other hand, Ouryu also has a conic frontal attack, so having the mages stand right in front of him isn't such a great idea either. The trick is to find the balance between the two.

* He is fairly easy to enfeeble with Silence, Paralyze, and Blind. Red Mages also need to Dispel his Stoneskin, which is very strong. His Enstone attack evidently cannot be Dispelled.

* He builds resistance to Sleep and Bind as the battle goes on. The third sleep gets pretty hard to land, and from then on, you'd need an Elemental Seal to stick Sleep for a whole...five seconds or so. >_<

* His Slowga cannot be Hasted over- it needs to be Erased first, then Haste reapplied.

* If Ouryu is slept, he will fly when he wakes up.

* You only need to get Ouryu to 30% HP in order to "win" this fight.


The plan was to randomly whittle away at his life until he flew. Then, one of the melees would use a Mistmelt, and the BLMs would Sleep him. Then, the Freezes would start. Gathering at Ouryu's front leg, all three BLMs would simultaneously cast Freeze. When the Freezes go off, Ouryu will fly again, whereby another Mistmelt can bring him down, and then the mages put Ouryu to Sleep again before going for a second round of Freezes.

The problem with this was that we were sleeping after each time Ouryu flew. That meant that when it was time for the {Freeze}{Full attack!}, we could not sleep Ouryu. After going through the battle many times (I died like, five times ; ;), many of us were feeling very disgruntled and frustrated at this fight. Finally, it came to the last group's turn.

Ironically, this was the group that we thought would stand the least chance at beating the BC. Our setup was NIN WHM RDM BLM BLM BLM. That is to say, one tank and five mages.

However, we actually managed to beat Ouryu, despite three of us, including the tank, dying! Personally, I haven't the foggiest idea how we managed to do it, especially since Ouryu also got off an Absolute Terror that forced us to Sleep him so our tank could wait out his terror (which can't be Erased). I think it must've been the extra healing support the WHM gave us in exchange for a melee, that, and we had an extra Mistmelt which we put to good use. Another deciding point was recognising that sleeping Ouryu after the first Mistmelt just wasn't going to work, since in all the previous runs, Ouryu's sleep resistance was too high by the end of the battle to execute the Freeze plan smoothly.

Despite all these improvements, the battle was still on the ropes. After the initial Freeze volley, I got hate and died when we couldn't ground Ouryu and Sleep him in time. I activated my Reraise, and then ran over to try and wait out weakness safely. That was one of the longest five minutes I've ever had, during which our RDM and NIN died. >_< What resulted was a rather (in hindsight, amusing) attempt at kiting Ouryu by the members left standing, that is to say, we were kiting Ouryu with mages. >_<

Somehow or another, we managed to actually last five minutes for my weakness to wear. One more round of Freezes later, Ouryu was at around 45% HP, or something like that. However, we were slipping away. Using our last Mistmelt, one of us landed an Elemental Seal'ed Sleep II on Ouryu and tried to rest up enough mana to get the 307mp needed to cast Freeze again. We hit 307mp, and went straight for the kill...

...except Ouryu woke up while Freeze was in midcast. >_<

The last few seconds basically involved me praying things would go well. I was unfortunately positioned behind Ouryu after Ouryu got turned around, and I really did not want a Spike Flail in my face, especially with us so close to victory. Two Freezes went off, to when we realised that Ouryu had run out of range of the third BLM's! >_< The last BLM ran closer in range and started casting Freeze.

In the 19 seconds it took to cast Freeze, we were all dropping like flies. I had long died after giving my last shot at an Aero II, the Ninja was down. A Stonega II from Ouryu took out two more members and soon it was just the White Mage, and the Black Mage desperately trying to get Freeze to resolve.

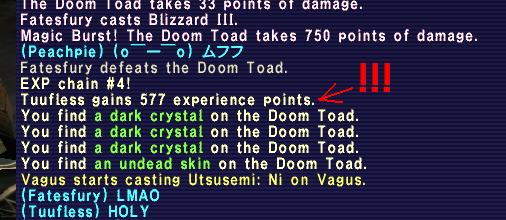
Thankfully, the final Freeze went off (no physical attacks to interrupt Freeze! ^^) and the next thing we knew, /cheers were going off as we realised we had actually managed to beat Ouryu! ^^

Of course, now I have to figure out how to get the rest of the TrueRune contingency through this BC, but I think I've learnt enough from our losses (and victory) that we are in good shape for trying again.

Here's a quick rundown of what I would recommend for everybody:

Have 8+ Mistmelts split between members. Everybody have a Reraise Earring and Hi-Potions for the melee. More Potions, obviously (15-20) for the tank. Since this is a very intense battle for the RDM, the RDM will probably not be able to keep Refresh up on the mages. Thus, everybody with a mana pool bring 3+ Yagudo Drinks. Melee should be able to perform some form of a ranged attack too, so they're not completely useless when Ouryu's in the air.

For the first part of the battle, use Mistmelts to ground Ouryu when he flies. However, do not Sleep him. You need his Sleep resistance to be low when it's time to start the Freeze volley, so just try to whittle his HP down. BLMs just alternate between Aero, Aero II, and Drain, while throwing in Cures to keep the tank alive. When Ouryu is at around 60% HP or so (I'm not sure exactly when), then it's time to start the Freeze plan as detailed above.

I'll try this strategy out with TrueRune's next attempt. I'll have to obviously change a few things to accommodate for Ksayyah's Astral Flow, but hopefully things will work out alright. ^^

10 October, 2005

{sky}{map}{Where?}

Some time ago, I picked up a Ve'Lugannon coffer key, and have since been meaning to find the coffer. For those who don't know, the Ve'Lugannon coffer contains the map to not only the Ve'Lugannon Palace, but the Shrine of Ru'Avitau as well. As such, given how I constantly get lost in sky, coupled with a particular liking towards getting maps, I really wanted to find this coffer.

Unfortunately, getting the map is quite a pain. There are a total of ten (10!) entrances to the Ve'Lugannon Palace from the Ru'Ann Gardens, and eight of them lead to possible coffer spawns. However, the eight positions are disconnected within the Palace, that is, you have to zone back out to the Ru'Ann Gardens and re-enter from a different entrance each time. Not only that, but anyone familiar with sky will know that magic aggro is everywhere. I think the only things in sky that don't aggro to magic are the Flamingos, and they're only outdoors...-_-

I had tried a few times previously, and failed simply becaues the coffer map I was using was (as I suspected), incomplete. They only had half the possible spawn locations instead of all eight. However, I managed to find a complete coffer map online, which I'll repost here for convenience's sake.


The numbered entrances, 1-10 follow the standard layout most published sky maps follow these days. Simply put, entrance "1" is the entrance to the left of the main teleporter from the Ru'Ann Gardens (to Brigandish Blade), then keep going clockwise around the Ru'Ann Gardens until you hit "10", which is the entrance to the right of the main teleporter (also to Brigandish Blade).

Bring plenty of Silent Oils and Prism Powders with you as well, including mages. The only practical chance you have at magically applying Sneak and Invisible is just upon zoning into the Ve'Lugannon Palace, after which all the magic aggro makes that a rather suicidal affair. In actuality, you will jsut need Sneak for a lot of the mobs in the Palace, notably Pots and Weapons. However, each entrance has a few Detectors that you need to navigate through, which you need Invisible for as well. Not to forget that the coffers are all behind doors, so you need to drop Invisible to open the door, and then reapply it in order to get out should the coffer not be there.

At some points, namely entrances "4" and "7", doors may prevent you from passing through. These doors are opened by activating the appropriately coloured monolith somewhere in the Palace. The entrance at "4" has the blue door, while "7" has the yellow one. While I don't recall just where the blue monolith is, I do remember that you pass by it if you work your way clockwise through to "4". As for the yellow monolith, the only accessible one I cound find was through entrance "10". The coloured doors also prevent passageway between the "5" and "6" zones, so you will have to exit and re-enter.

As always, things are not without event. I was running through the golem part of the Palace, when, upon finding that the coffer was not at the spot, I put Invisible back up and proceeded to make my way out...

All was fine until a golem popped in front of me. Normally, this is not a problem, until I noticed that first off, I didn't remember a golem here, but secondly, there was something about this golem that just didn't feel right. Call it a taru's intuition, but maybe it was perhaps, bigger than normal?

I instinctively turned around and ran, and as I thought...

...Zipacna {Found it!}

Seriously, of all times to pop...why then?!

Anyway, I eventually found my coffer, at the second-to-last spot, too. -_- Finally having the map to the indoor areas of sky though, makes things very useful. Well worth the trouble too, I'd say. ^^

01 October, 2005

It's Raining Mannequins!

My recent delvings into other jobs, of which has so far grown to encompass BLM, WHM, RDM, SMN, NIN and BRD has given rise to a very glaring problem:

I have nowhere to store all my gear! >_<

Sure, there's always muling, but with the horrible limit on the number of items one can send through delivery at any one transaction, I really really detest muling, not to mention that I have to take one of my mules, run all the way to the Auction House, and run all the way back! No Warp! ; ;

With that in mind, I set about trying to complete something I've been passively "woking" on: completing a Mannequin.

Here's the run down. A Mannequin adds seven storage spots, so effectively, you trade one Mog Safe slot for 7 Storage, effectively gaining an extra 6 storage slots to keep things in. What's more, you can even equip your Mannequins with gear, so not only do you have a place to store your gear that you've accumulated, you also have a way to store it such that you can look at it and admire your little collection~. ^^

The problem is, you have to assemble the first Mannequin by yourself. There are five pieces you need to collect in order to complete the quest, which the Mithra in the Mhaura Goldsmithing Guild gives you. After talking to some people all over Vana'diel, your task then becomes to collect a Mannequin Hands, a Mannequin Head, a Mannequin Body, a Mannequin Legs, and finally, a Mannequin Feet.

Three of these pieces drop from BCNM20 fights in Giddeus, Waughroon Shrine, and Horlais Peak. These are 3-man fights, and each fight has one of the Mannequin parts as a guaranteed drop. In addition, each of them have a chance at dropping a second part, but this doesn't always happen.

Here's where you can obtain the first three parts:
Mannequin Head: Horlais Peak BCNM20 "Shooting Fish"
Mannequin Body: Waughroon Shrine BCNM20 "Crustacean Conundrum"
Mannequin Hands: Balgas Dias BCNM20 "Charming Trio"

The last two parts, the Legs and Feet, are dropped from any of the three basic city's Garrisons.

Previously, I had already completed "Shooting Fish" with Starfox back sometime in May. One of the easiest ways to get this fight done is to bring two Summoners in, and basically with a combination of Judgment Bolts and Thundersparks, the BCNM fight is both safe, and easy. So that was the Head down. ^^

I ended up buying the Mannequin Body of Thazienne when I chanced upon her Bazaar up in Upper Jeuno. I'm personally not a fan of buying parts, but I didn't think I could find a group to go do Crustacean Conundrum, since that is reputedly the hardest of the three.

I did, however, manage to gather up Akanea and Saoirse for "Charming Trio". The fight pits you against three Leeches, named Prune, Phoedme, and Pepper (don't ask why :P). The strategy for this is pretty simple. Grab two melee DD (no tanks) and a WHM, suit up with some Hi-Potions and a Yagudo Drink, and just go for it. Okay, so the battle isn't quite that simple. As it turns out, all three leeches have attacks that can not only Drain and Aspir, but also sap TP and even buffs, including food buffs! As if that weren't enough, they can also drain one's stats over time, so this fight isn't quite as simple as "run up, beat up a few things, and run out".

You definitely want DDs for this fight. Conventional tanks generally don't stand much of a chance since a Paladin will just succumb to the massive draining over time and fall, while a Ninja can't keep up with several Leeches pounding away at him, especially before Utsusemi: Ni. In fact, the message boards recommended DRG, since they do more damage than a WAR at this stage, and can wear the same DEF gear. That being said, Akanea had quite a shock when he found out that I actually wanted him to come as DRG. ^^

Saoirse came down as MNK as the other DD. I came as healer, WHM.

The strategy for this fight was relatively simple. Akanea would run in and aggro all three leeches, but only take on one of the weaker leeches (Phoedme or Prune). Saoirse (not being the tank), would Provoke the other weaker leech off Akanea, and each of them would solo their own leech, with me giving healing backup (and Aka having Pepper pounding on him as well. -_-) Once one of the weaker leeches were dead, whoever killed it would help the other out with their own leech until both weak Leeches were down.

Then it was {Full attack!} on Pepper. ^^


Oh, and if you're wondering why I'm wearing my Goldsmith's Apron, I came all equipped with Level 20 gear, but forgot that my Cotten Doublet is Level 23. So Goldsmith's Apron it was. >_<

We ended up beating the fight, and actually went through the BC two more times, once for Akanea and once for Seraphpdh who also wanted a mannequin of his own. My drop actually dropped both the Hands and the Head (which doesn't always drop), and I let Seraph take it.

After we were done, I went back to Jeuno where I found somebody Bazaaring a Mannequin Legs in Upper Jeuno. Granted, the price was rather >_<, but I figured I could syphon the KS99 money into my Mannequin, and so I bought the Legs. I had already previously bought the Feet for a rather cheap price some time ago, too, and so, I had my completed set!

I trundled over to Mhaura, and showed the Mithra what I had collected~


She said she needed some time to piece everything together, and so, one real life day later, I came back to find that she had managed to piece together a Mannequin for me! When I left Mhaura, not only did I have the Mannequin she gave me, but I also purchased a second Mannequin off her for 250,000 gil. You can have one Mannequin for each race/gender combination but I only needed two for now.

I went back to my Moggie-Woggie house, and started putting my WHM and RDM AF up on display!


These Mannequins are great- I finally have a place to store all my AF, and managed to free up enough slots in my Mog Safe to store NIN gear as well (I've been leveling NIN recently). Sure, I have to go back to Bastok to retrieve my WHM or RDM gear whenever I want to play either class, but I don't really see that happening anytime soon. Besides, they look purrrty! ^^

On an additional note, Sotose and I later went to help Seraph out on Crustacean Conundrum (which made me a littaru bit mad at buying my Mannequin Body, but oh well. ; ;). The reason why many people consider this BC20 fight to be the hardest of the three is because there are three crabs, like the Leeches. The good news is that they have very little health, like 25HP or so. The bad news is that not only can the crabs Drain you, all attacks against them do 0-2 damage. Period. It doesn't matter if it's chucking a Pebble, or Astral Flow, 0-2 damage.

And so the idea is to pile as many attacks as we could on the crabs. A Monk's Hundred Fists comes to mind, but instead, we went with PLD/WAR, RDM/NIN and RDM/NIN, with us Dual Wielding two 150-delay Daggers (Platoon Dagger + Beestinger) with Enthunder.


For some reason, it didn't feel so hard after that, and I have to admit, dual weilding low delay weapons stacked with Enthunder is quite fun. ^^ For those who are interested in trying this particular BC20, it's nice to have a Paladin for Invincible, since that negates any Drains the crabs do against the PLD, so you don't have to deal with the crab regaining its HP again. ^^